Wednesday 29 February 2012

The Straw Man

This was the simplest model that I produced. I started with some basic shapes, a sphere, capsule and four cylinders. For the arms I had to Bend them into place with the Bend modifier. The other shapes I just had to move them into place.
I then textured this base model using the UVW Map to fit the texture correctly. In order to add a bit of realism, I decided to add some straw sticking out from the body as a straw man would not be completely smooth. To do this I created cylinders with a very small radius and then clumped them together. I then placed these around the body of the model to create the illusion of loose bits of straw poking out of the body.


Third and final model finished!

Tuesday 28 February 2012

The Ornithopter

The Ornithopter was Da Vinci's attempt to mimic the way that a bird moves it's wings to achieve the lift it needs to fly.
This model consists of basic shapes, fitted together like pieces of a jigsaw. The challenge with this model came when trying to add the wings.
For this I decided that the easiest thing to do would be to find a picture that I could use to create a texture that would match the wings, much like we did with the leaf tutorial detailed in earlier posts.
I found a suitable image and imported it into Photoshop. From here I cropped the image until I had the desired segment and then outlined the area I wanted and neatened it up by placing another layer underneath the original and creating a tight fit around the shape I wanted.

I then had the picture (texture) that I wanted and a black background with the exact outline of the image. I could then import the texture as normal into the material editor. Once I did this I had the wing set against a white background. In order to get rid of this I imported the cut-out image into the opacity section leaving just the wing texture.

Finally I created a plane and textured it with the wing image and positioned it.
Second model, finished.


The Tank

The tank started life as a two flattened cylinders and a couple of cones. Once the basic shape was established and put into place it was time to add the cannons.
This gave me a chance to use the lathing technique. Initially I drew out a 2D image in Illustrator as the base. This was a cross-section of half of the cannon. The lathing tool would be used to rotate this 2D image around a specified pivot point to create the final 3D model.
Once the image was imported into 3DS MAX I set about this process. First on the list was to edit the pivot point around which the image would be rotated. By default this is in the exact centre of the image, I learned that if this pivot is not moved before lathing, my cannon quickly resembled a candle stick. Not the desired result, as beutiful as it was. Having learnt from this mistake, I moved the pivot to the edge of the 2D image and then lathed it. I have a cannon!!
This was the point that I started to regret my choice of invention, I rememberered that Da Vinci's ingenius creation had a total of 36 of these cannons. Initially I thought that I would have to create 36 copies of my cannon model and then individually place them around the tank hull. :(
Snapshot to the rescue!! First I created a path for the cannon to follow, a circle, and placed it in the correct position. Next the cannon needed to be locked to that assigned path around the circumference of the tank. This was done by clicking the Animation tab, Constraints option then Path Constraints, I was then presented with an elastic band thingy which I attached to the path, I did have to reorientate the cannon a little as it defaulted to facing inwards.
Once the cannon was locked to the path, all I had to do was duplicate to cannon around this path. Snapshot did this wondefully. I just had to check the range box and then input how many copies I wanted.
Then came the wheels. A flattened cylinder to start with, I then converted it to an editable poly and deleted faces to create the spokes. Unfortunately, as the shapes are hollow, this meant that you could now see into the structure of the wheel. All I had to do here was to add some faces to cover these gaps.
I also added some lighting to this render. For this I needed to create a plane for the shadows to appear on. I then created a daylight system that mimics the conditions in Milan on a summer evening, romantic, I know!
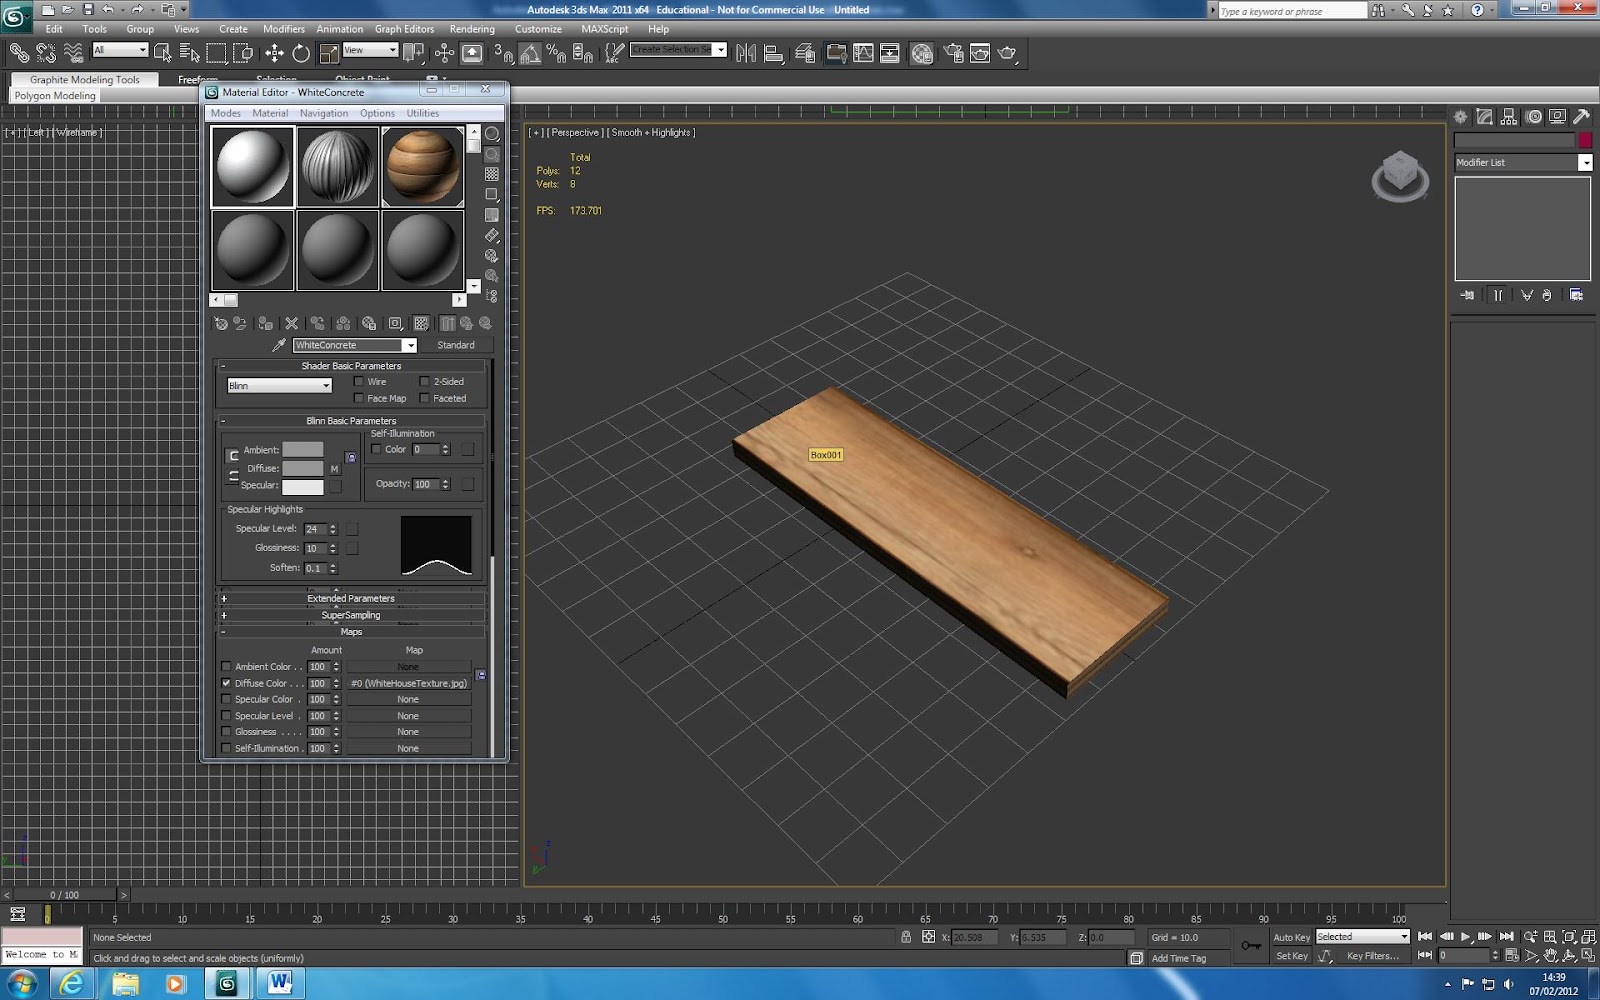
Finally came the texturing, this was just a matter of finding suitable textures images on the internet and importing them into the Material Editor as bitmaps and then adding the images to the Bump section in order to give them a more realistic texture in the final render.


That was it, first model.....DONE!

THE ROLLERCOASTER!!

Forget bouncing balls, think Space Mountain!!! This time we were focusing on the cameras.
Initially we created shapes to travel around, complete with the legendary teapot!!
Once the shapes were in place we had to trace out the "track" that the camera was going to follow.
We then created a free camera and locked it to the track with the path constraint option. Checking the Follow and Bank made the camera bank around the corners whilst following the track.
The end result was a nausiating ride rivalling any rollercoaster open today, perhaps a slight exaggeration but nonetheless VERY cool :D

Initial Animation Techniques

Would you believe that animating a 3D model is easier than actually modelling it!! No, me neither!!
For our first animation we created a simple bouncing ball. This was done by using the Set Key to create an initial up and down motion. But that wasn't enough, OOOHHH no! Definitely not realistic enough!
This was tackled by using the Curve Editor. This was a graph of the motion of the ball. If you think of a bouncing ball in real life the fastest points in its motion are when it hits the ground with the slowest at the apex of the bounce.


With the help of some handy preset curves the graph was edited to make the bounce more realistic. The bounce can be looped by using the Parameter Curve Out of Range tool and selecting the looping curve, showing dotted curves outside the established timeline.

Then came the duplication!! Why have one ball when you can have three for the same price?! When we copied the initial ball the frames of animation on that ball are also automatically copied, meaning that when the animation is played we have multiple balls bouncing identically. Enter Dope Sheet! Similar to the Graph Editor in that we get a representation of the timeline of the animation, where it differs is that the lines are all flat representing the keyframes.
These lines represent each individual model with a Global one representing all of them at the same time. These lines can be moved and squashed to edit the individual motions of the different object on screen.
Hay Presto, first animation :D

Tuesday 14 February 2012

Daylight System

Building on the previous lighting tutorial, we now see the use of daylight in 3D Studio Max.
The first step was to change the render settings to Mental Ray Renderer giving us access to the Arch & Design material setting. Now we can use various set finishes for real life materials.
Once the materials were applied to the objects we began on the lighting.
By going into the Create tap and selecting Lighting then selecting Daylight System we now get the option to set the light position in the form of a compass. We can then set the location including the country or even city, the time of year and even the hour of the day.
Once we set up all of that we end up with somethuing a little like this!


Lighting

We have moved onto lighting!!  The main lesson that I have taken from this tutorial is that I am not a natural lighting expert.
However, after extensive trial and error, I managed to accomplish something reasonable enough to post here.
Starting with a ready made pumkin, we proceeded to put in some lighting effect. Firstly an Omnilight was placed in the centre of the pumpkin to simulate a candle. This light is essentially an orb of light, emitting light in all directions.
We then created a Target Spot, amptly named as it is a spot light. By modifying the Hotspot and the Falloff effects we were able to change the hardness of the light shining upon the pumpkin. We could also change the colour of this light, helping to give the spooky feel to the render.
Although this all sounds terribly simple, I quickly became overwhelmed with all the different settings and the numbers that were to be changed. However, after some guidence it soon became clearer.
Behold the final product!!


Tuesday 7 February 2012

Leaf

In this tutorial we created a leaf using an image edited in Photoshop. Having opended the image in Photoshop it was then traced around in another layer in order to make the background a closer fit.
The original image was then imported into 3D Studio Max using the material editor. Initially this gave a preview of the leaf wrapped around the preview shere. To correct this the black and white background image was imported into the Opacity section of the Material Editor. This created a curved image of the leaf on its own.
Now the template of the leaf is ready a plane was built and the material was placed on to it. It was then simple soft selection to curve the leaf into a more realistic leaf.
Hey presto!! LEAF!!

Materials

Having got to grips with some basic shapes and modelling techniques it is now time to give the models some texture. To make metal metallic, wood woody etc. Handily, 3D Studio Max has a built-in matrial editor. This window allows you to import custom textures that aren't found in the libraries.
In the screen shot below I have started basic and gone for a plank of wood.
When going into the materials editor you are presented woth a view of six spheres, these are your templates.
To import a custom texture all we needed to do was to click onto Diffuse and select Bitmap, this allows you to select the texture picture.
The challenge now comes when making the material, basically a picture rapped around the object, appear realistic. The best tool for this was in the maps tap. Just dragging and dropping the image route into the Bump row gives the texture picture bumps and lumps and actual texture. This can be fine tuned along with the glossiness and specualr level to give the proper lighting effects.

Saturday 4 February 2012

Research-Bicycle

An invention that the majority of us have all used and perhaps the one that has withstood the test of time the relatively unchanged, the humble bicyle.

Is there nothing he didn't think up?

Research-Robotic Knight

The original Terminator, that's right, Da Vinci thought of it first!
In fact it was the fruit of Da Vinci's fascination of human anatomy and worked through a series of pulleys and gears. This genesis to the robot family has inspired  modern day robotic endeavor, with some of the basic principles being employed in space exploration!
A man ahead of his time and no doubt about it!

Research-Aeriel Screw

In an attempt to test the fluid nature of air, the aerial screw was intended to fly by pushing the air downwards, propelling the craft into the sky.
It has obvious similarities to a helicopter, however it is unlikely to ever be able to fly.

Research-City of the Future

Perhaps one of Da Vinci's most impressive imaginings in terms of sheer scope, his ideal city was a picture of a utopian settlement.
It was designed in response to the Black Plague sweeping Milan at that time, and focused on sanitation and hygiene.
It was designed on various levels based on cleanliness with specific channels for water distribution to each house and canals to remove waste from the city. Ideas that mirrored modern-day plumbing.

Research-Self-Propelled Cart

This invention could be considered the world's first car, of course, as it requires no driver, it could also be considered the world's first robotic vehicle. Pretty advanced stuff!!
There were some slight teething problems with this pioneering creation. Unfortunately it was only capable of right-hand turns.
However routes could be "programmed" by inserting blocks into the gearing mechanism. Almost like a built-in sat-nav!

Research-Armoured Tank

The first of the iconic war machines that we know so well today. Da Vinci's armoured tank offered a completely new dimension to the battlefield, allowing up to eight soldiers to enter the fray under total protection. Armed with an arsenal of 36 cannons positioned around the circular tank hull and moved by the occupants leg power.
An interesting side note is that building the tank strictly as they have been drawn by Da Vinci would mean that it would not be able to move. A brilliant mind like Da Vinci would not overlook such detail so it may be that he had intentionally included this fault, highlighting his hesitation at using his creativity to produce such devastating war machines!

Research-Diving Suit

Revolutionary in its time, the diving suit presented a completely new way of attacking enemy ships without ever being detected, a concept totally unimagined in those times. The idea behind this pioneering creation was to sabotage enemy vessels from below, avoiding detection.

Research-Machine Gun

Only meant for short bursts of continuous fire unlike the modern versions capable of prolonged barrages. The radical and creative design incorporates a rotating, three tier barrel system. Whilst one group of barrels is firing another is cooling down whilst the third is being reloaded. A deadly piece of kit for the for the historic battlefield.

Research-Ornithopter

A flying machine inspired by the way in which a birds' wing moves. Aerodynamically sound however the difficulty comes when trying to take off solely through human elbow grease as even the most herculean of individuals would find it impossible to make it above an inch off the ground.


Research-Parachute

Basically a triangular canopy with which a very brave individual could jump from great heights! Its modern counterparts are more rounded in design.
Mr Adrian Nichols, in 2000, tested a prototype based on this design and noted that it was in fact smoother than modern chutes!
Bravo Da Vinci!!

Research-Ball Bearing

The majority of modern technology depends upon this invention. They are used in a number of Da Vinci's marvelous machines, without which, they wouldn't be possible!
They simply consist of cylindrical objects, most commonly balls, between two rotating surfaces, this greatly reduces friction and therefore wear and tear. Ingenious!!