Thursday 3 May 2012

Sound Editing


Sound Editing
Once the animation had rendered, it was time to add the sound. Although this was not a requirement of the specification, I felt that it would just be a nice touch.
Using Adobe Premiere to add the sound was very simple. The software is very easy to pick up, with the hardest part deciding what formats to use for the output. Once opening the software, the animation render was imported. It appeared in the top left-hand corner of the window and then it was just a case of dragging and dropping it into the timeline at the bottom of the screen.
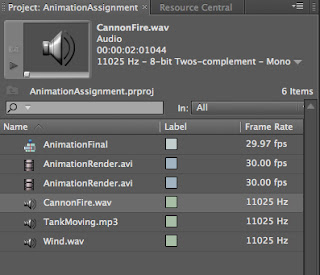
The sound clips were imported in the same fashion and dragged and dropped onto the audio timeline below the video output. It was then a case of matching the sounds to the animation. This was done easily by dragging the sound clips along the timeline, clipping or extending them. Throughout the process you are able to see the animation in the top right-hand corner of the window to make the overlay of sound easy to see.
And that was that, 12 weeks and one animation complete with sound effects!

Monday 30 April 2012

Rendering


Having completed the animation, including tweaking the various aspects, as explained previously, it was time to render it. Fortunately this was a relatively simple process once the required output format had been chosen. The only aspect to watch out for was the file location.

Once you are on the rendering options panel, it is easy to just see the big ‘Render’ button a press that straight away. This will, of course, render the animation but once the render has completed you will be dismayed to learn that it has not been saved on the computer.
Before the render button is clicked it is important to specify a file path in which the final render is to be saved. This is done my scrolling down the rendering setup menu to the output section. Within this section is a default file path, the one that will not be saved on the computer. To edit this, the ‘file’ button was pressed and then the desired file path was created.
Once this had been done, the render was initiated.

Timeline Adjustments


More of an oversight than a necessary part of the project, when the whole animation was complete I realised that the whole thing was spread over just 100 frames. This created a problem in that when it was played, if you blinked you would miss it. Of course after spending so much time with the clip, this was not a desirable outcome.
To rectify the problem, the timeline editor was used to extend the frame count to 1800. This frame number was chosen because this would make the animation a total of a minute at a run-time of 30 frames-per-second. Unfortunately this did not automatically reposition the key frames within the timeline.
Because the key frames were not automatically moved with the timeline lengthening, this had to be done manually. To do this was just a case of clicking on the key frames in the timeline and dragging them to the appropriate position. Of course some simple calculations had to be done to make sure that the key frames were being moved to the correct position. This was a largely problem-free procedure with the exception of having to fine tune some of the key frame placements so that the animation played out as intended with regards to the camera position in relation to the model movements.

The Great Blue Beyond


Having laid out the majority of the animation, I realised that as the Ornithopter soars through the air, it is, in fact, placed against the rather dreary grey default background of the 3DS Max environment. I felt that this was not realistic and also would not do justice to the wonderful flying machine invention of the great Leonardo Da Vinci.
Rather than flying through the grey expanse of emptiness I decided to place the winged machine into the great blue beyond, where it belongs.
Initially I had planned to just include the sky in such a way that it would not surround the entire environment but could be seen from the camera. However, due to the panning of the camera, the entire environment had to be surrounded.
To achieve the necessary effect, I placed planes against all four edges of the bottom, ground plane so as to create a box with the roof missing. It then became a matter of texturing these planes with the brilliant blue of a clear sky. This was just an image from the internet as it was felt that simply colouring the planes in would not achieve the subtle contrasts of a real sky backdrop.
Once the blue backdrop was in place, the lighting needed to be put into place. This was achieved by the inclusion of omnilights. Originally, it was felt that a single light would be sufficient, however when this was put into the scene it was discovered that no matter where it was placed one of the sky planes became completely black, as if in shadow. Of course this was not acceptable.
To solve the problem, one light was placed in the centre of the scene, serving as the main light source and then a second to illuminate the shaded sky panel. These lights provided a nice light source for the scene with the models casting the appropriate shadows.

Invisible Cannon Balls


Whilst doing the camera orientation I came across a different problem. The cannon balls were, as I mentioned before, present throughout the animation, hovering in mid-air. This became a problem because the camera would see them before the tank arrived to cover them up. This meant that I had two options. I could either make the cannon balls move with the tank from the start of the animation or make the cannon balls invisible until they were needed. I decided to do the latter and edit the animation so that the cannon balls could not be seen until they were fired from the cannons.
To achieve this, I employed the wonders of the Auto Key tool. From the start of the animation I created a key frame and edited the cannon ball Object Properties to make them invisible. I then added another Key Frame just before the cannon balls were about to fire to make them  visible again.
This meant that the camera would not see the cannon balls until they were fired from the cannons and hit the targets.

As a side note, I had tried to modify their visibility using the Set Key tool however editing the visibility through this method did not change the animation. They were either visible of not throughout the whole animation regardless of me putting in key frames to change this.
I’m glad to say, problem solved!

Camera Path


Once the basic movement was finished, the camera was then added and positioned so that it recorded the action. Using the storyboard I had created earlier in the project as a guideline, I created a line that was to become the path that the camera would follow through the animation.
Initially I mapped out the path on a flat plane and the edited the line to incorporate the height variations that needed to be added. The camera was then added, ctrl + C, and constrained to this path. As with the models previously, the camera did not change its angle as it moved along the path. This issue was not as easy to fix as before (by clicking the follow box) as I needed to change its angle at various points along the path to focus on the relevant model.
This was accomplished by using the Set Key function to change the orientation of the camera throughout the various frames of the animation. Although, in itself, this task was not technically challenging, it was time consuming as I had to go through the entire animation, mostly frame by frame, editing the camera orientation.
This allowed me to fine tune the camera angles for the whole animation.

Target Impacts


After I had lined the cannon balls up so they actually went through the straw men, I then had to animate the straw men being hit and being knocked aside by the cannon ball.
Initially I wanted to use the Reactor for this effect but found that it was very difficult to get all the cannon balls hitting the straw men accurately. Instead I chose to manually animate them using the Set Key tool.
I went through the timeline to see the exact frame at which the cannon balls hit each target and started their motion from this point. Depending upon where they were hit I rotated and flipped the straw men accordingly.
This was more challenging than I initially thought as I had to guess how far back they would be moved by the force of the impact. Also, as I had wanted to make each cannon fire at slightly different times and the cannon balls move at various paces (reflecting inaccuracies in cannon technology) the animation of each straw man had to be tailored to their own specific impact.
Additionally, once doing the impacts I realised that that cannon balls stopped in mid-air which was not awfully realistic. This was rectified by adding in some key frames using the Set Key tool to make the ground their ending position.